


Okay, so I've been getting quite a few questions about how I edit my photos.
I thought I'd give you a step-by-step of how I usually edit them! I've never had any sort of Photoshop training, this is just what I came up with by playing around.
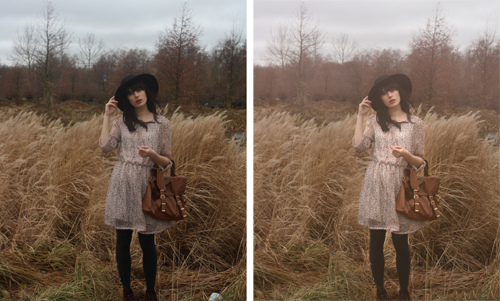
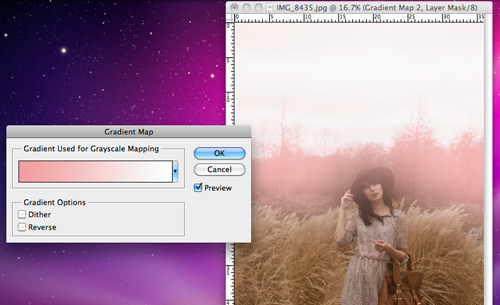
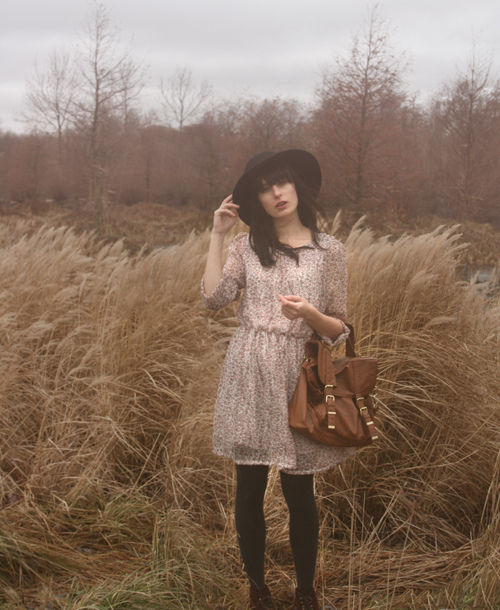
So the left one is what came out of the camera, the right one's what we're gonna create.
I use Photoshop CS on this Mac, but what I do can be done (better) with all other versions of Photoshop.
First I use the clone stamp tool to get rid of those plastic bags, streetlights etc.
What I always use are gradient layers. If you've never used them, play around with them a bit. They can really change the look and feel of your photo, and achieve a much nicer effect than the photo filters Photoshop offers.
Go to Layers > Adjustment Layers > Gradient Map. You'll end up with a screen looking somewhat like this:
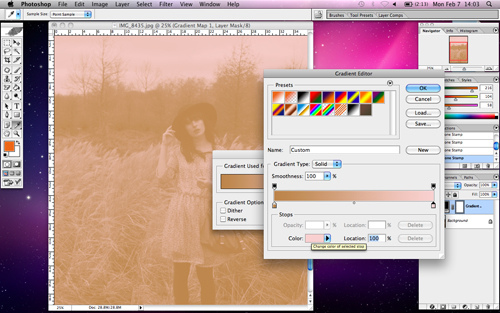
I usually just do a two-color gradient; you can choose the colors you want by clicking on the little square underneath the bar. I usually take yellow and pink tones, but if you're looking for a different atmosphere you could go for blue or whatever you like. Like I said: fun to play around with.
Once we've applied the layer, we're gonna lower the opacity.
See what happens to the colors in your photo.
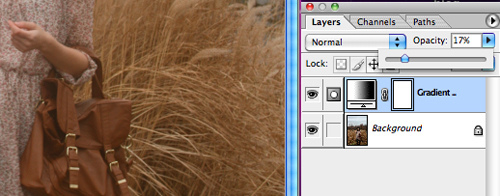
Because you're working in layers, you can always go back and change the colors if they don't end up the way you expected once the opacity's lowered.
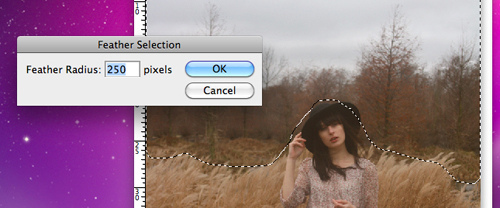
Feathering just means you're smoothening the edges of your selection. The amount of feathering needed depends on the size of your photo. Seeing as mine's pretty big I'm gonna take the maximum of 250px.
Then you go to Layers> Adjustment Layers > Gradient Map again.
As you can see, the gradient shows only on the part that I selected. I chose light pink with white, but again, play around with that. Keep the colors lighter than the original colors though.
Again, lower the opacity to where you think it looks nice. It's important to keep it subtle.
Then I select the subject of the photo, feather it a bit and make a levels layer. (Layers> Adjustment Layer > Levels). I drag the right arrow a bit to the centre, you'll see it'll become a bit lighter.

In the end I crop the photo a bit (always save cropping for last!) and I'm done!
Hope that was helpful!

30 comments:
Great tutorial! Thanks so much for sharing. You've given me lots of great ideas.
XOXO
Just brilliant!
Thanks that was really helpful :)
yes VERY helpful! thank you for sharing this awesome tutorial! I'm totally going to use some of this.
I love how subtle it is, though how much it changes the final image. I never thought you edited your photos for some reason. "Photoshopped" never really jumped out at me when I looked at them :) Nicely done!
Cool! I've been used to using elements but recently upgraded to photoshop feel a little over my head but this is definitely helpful!
Super cool zeg! En wat knap dat jij je dat zelf hebt aangeleerd :)
x
So cute!!!
kisses
www.thecurlylady.blogspot.com
oh thank you for this! i love trying out different photoshop tutorials, and your photos always look so lovely. xxx
wow thanks!!! amazing tutorial!!! i must play a bit with photoshop as you say!!!:)
great and lovely pic!!!
great!
wow, so inspiring!
Thanks for sharing dear! Lovely picture xx
Thank you! :D
oh my gosh! thank you thank you thank you! i got photoshop elements a few months ago and i have been so frustrated trying to figure out how to get dreamy photos like this one. i would love more tutorials if possible!
today is the last day for the Boots skincare GIVEAWAY: http://lachapstickfanatique.blogspot.com
Great tutorial!!
www.theclassique.org
lindo tutorial
This is excellent! I only use the basics in Photoshop... this looks fun and very useful, I must play around a bit and try it out.
Thank you for the tips :)
I've been using photoshop for a while now, but I've never seen this technique used before. thanks for being inspirational!
this is great... photoshop seems so difficult for me! haha
xx
Thank you thank you THANK YOU, this was amazingly helpful. I don't have photoshop at the moment but have been looking into getting it but didn't know where to begin with using it. Your photos are amazing, the little touches you put on them push them into a whole new level of beauty. xo
http://givemebows.blogspot.com/2011/02/ootd.html
without or with, beautiful as well!
Ah I wish I still had CS! This is a very nice tutorial. Photoshop is so fun to mess around with.
Thanks!
new blog:)
http://littlelion-janell.blogspot.com/
I have been trying to edit my photos for so long! I hope I can achieve your greatness...
xo Emily Jenny
florencenightsandfairytales.blogspot.com
Ik kom via jou klasgenootje en mijn vriendinnetje Ellis op jou blog, en wat is hij leuk :)
Oh wow! Your tutorial helps so much. Thanks for doing this, Laura <3
Thank you so much for this. It's very interesting how subtle the photoshop effects are, giving the picture a more richer undertone. Great job!
I have a MacBook and desperately want photoshop. Where did you purchase your photoshop suite? Do you have a MAC? Was it outrageously expensive?
www.thegiftofgab-gabby.blogspot.com
Fantastic tips. How did you get photoshop. Did you buy it or download it???
XXXXXXXXXXXXXXXXXXXXXXXX
Following you now, also in my blogroll.
So glad to have found you!!!
XXXXXXXXXXXXXXXXXXX
Post a Comment